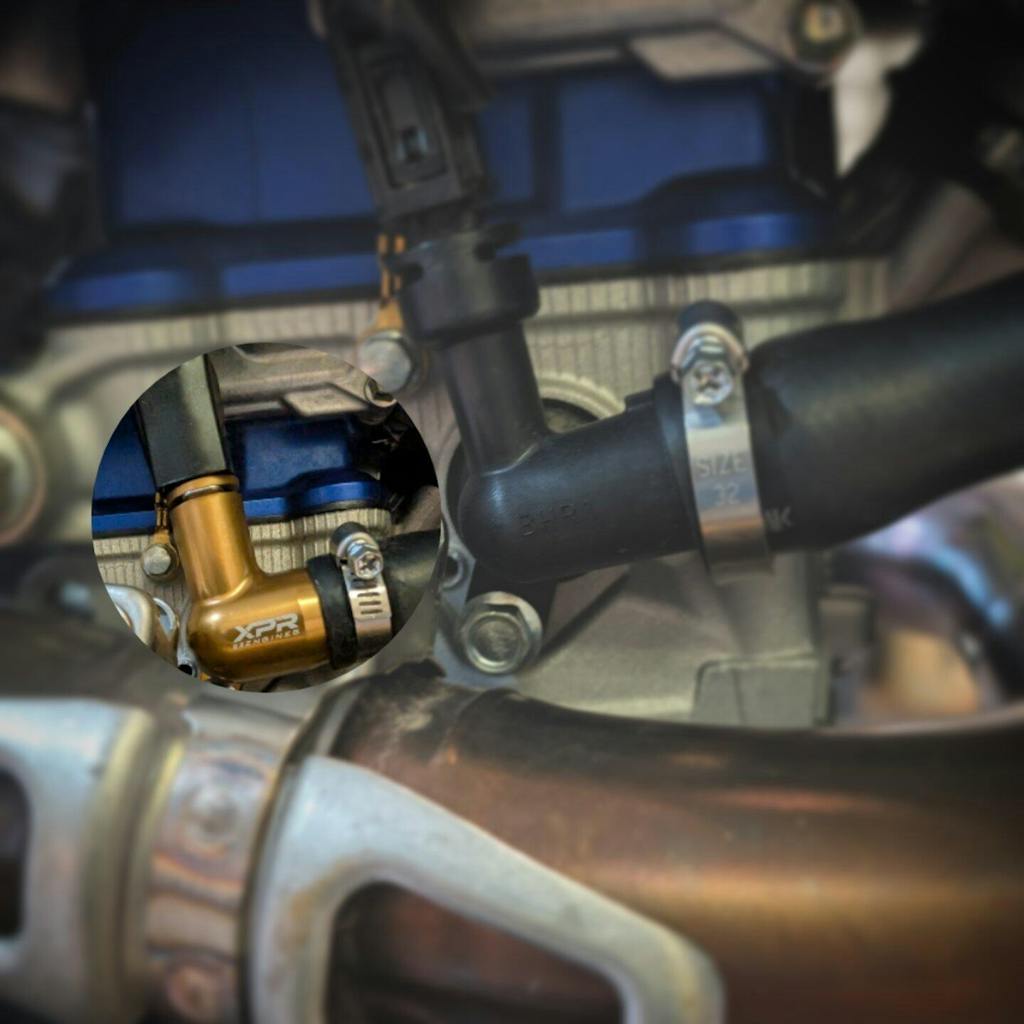
YZ 450 23/24 Waterspout

  • Sale
  • Regular price $139.00
Shipping calculated at checkout.

Overview
Shipping & Returns

If you've ever wondered if the exhaust pipe on your 23/24 YZ 450 could melt the plastic OEM waterspout, we have engineered our own custom billet aluminum waterspout to prevent this from happening.

*Please be aware that the colors of our products may vary slightly due to the production process.

Please Refer to our Install Sheet for more information

How to install

⚠ WARNING: Installing these parts improperly can damage your motorcycle, cause a crash, serious injury, or death.


Before you start:

Read these instructions and those in the OEM Service Manual for removing and installing any part as applicable. You need the OEM Service Manual for the proper procedures for the removal of parts, installation, and torque values or specifications.


⚠ Disclaimer: If you feel uncomfortable at all following these procedures, seek a professional mechanic for these modifications. We highly recommend you have these procedures and modifications professionally done. Proceed at your own risk!


Tools & Supplies Required: (not supplied)

  • Common hand tools (e.g., wrenches, sockets, etc.)


⚠ CAUTION: Before you begin working, be sure you are wearing eye protection and gloves.


Removal:

  1. Drain the engine's coolant.
  2. Remove the seat.
  3. Disconnect the battery.
  4. Disconnect the Coolant Temperature Sensor.
  5. Remove the Exhaust Header.
  6. Remove the OEM Waterspout and disconnect the coolant hose.


Installation:

  1. Install coolant hose to the new Waterspout and tighten the hose clamp.
  2. Install the new Waterspout and O-ring into the head, ensuring it's firmly seated and bolted in to the OEM Service Manual's specifications.
  3. Connect the Coolant Temperature Sensor and secure it with the retaining clip.
  4. Reconnect the battery, reinstall the seat, and refill with the proper coolant.


    • Built to last with solid aluminum construction
    • Choose from 2 colors
    • Easy to install with our instructions

    Shipping

    We offer free freight for online orders over $75.00 in the USA (Excluding AK & HI) Online orders only.

    For International orders:

    All orders will be shipped with an original invoice on the box, which shows the full amount that you paid for the products you have purchased. This will ensure that your package processes through customs with no delays. Some countries have import tax laws, in which case you would be liable to pay import tax on the items you buy from us. Please do your best to educate and familiarize yourself with these policies in your country. You may be responsible for paying these fees once you have received the package.

    Returns

    We want you to be happy with your XPR products and offer returns on orders 30 days after they are shipped. If for any reason, you're not happy with your purchase contact us.

    Lifetime Product Warranty
    Free Shipping Over $150
    Free 30 Day Returns

    rating
    brandImg
    "You'll actually feel the difference between a stock ECU and a Vortex ECU mapped just for you."
    rating
    brandImg
    "I have a XPR Vortex and it is the best bang for the buck modification you can get!"
    rating
    brandImg
    "XPR's custom Vortex mapping is much better than the stock ECUs. Feels powerful and easy to ride now."

    Frequently Asked Questions

    Description

    If you've ever wondered if the exhaust pipe on your 23/24 YZ 450 could melt the plastic OEM waterspout, we have engineered our own custom billet aluminum waterspout to prevent this from happening.

    *Please be aware that the colors of our products may vary slightly due to the production process.

    Please Refer to our Install Sheet for more information

    How to install

    ⚠ WARNING: Installing these parts improperly can damage your motorcycle, cause a crash, serious injury, or death.


    Before you start:

    Read these instructions and those in the OEM Service Manual for removing and installing any part as applicable. You need the OEM Service Manual for the proper procedures for the removal of parts, installation, and torque values or specifications.


    ⚠ Disclaimer: If you feel uncomfortable at all following these procedures, seek a professional mechanic for these modifications. We highly recommend you have these procedures and modifications professionally done. Proceed at your own risk!


    Tools & Supplies Required: (not supplied)

    • Common hand tools (e.g., wrenches, sockets, etc.)


    ⚠ CAUTION: Before you begin working, be sure you are wearing eye protection and gloves.


    Removal:

    1. Drain the engine's coolant.
    2. Remove the seat.
    3. Disconnect the battery.
    4. Disconnect the Coolant Temperature Sensor.
    5. Remove the Exhaust Header.
    6. Remove the OEM Waterspout and disconnect the coolant hose.


    Installation:

    1. Install coolant hose to the new Waterspout and tighten the hose clamp.
    2. Install the new Waterspout and O-ring into the head, ensuring it's firmly seated and bolted in to the OEM Service Manual's specifications.
    3. Connect the Coolant Temperature Sensor and secure it with the retaining clip.
    4. Reconnect the battery, reinstall the seat, and refill with the proper coolant.


      Customer Reviews

      Based on 15 reviews
      100%
      (15)
      0%
      (0)
      0%
      (0)
      0%
      (0)
      0%
      (0)
      j
      justin kasza

      I had Chad remap my vortex for my 23 crf250 , it runs much cleaner and pulls longer on top now Im waiting for winter , going to see what xpr can do to the motor ??

      k
      kevin peacock
      Awesome!!

      Getting a vortex ecu with xpr's customer maps is by far the best money I have spent on my bike. This should be everyone's first purchase if they are looking for better performance from they're bike

      J
      Jonboy1203
      Excellent product

      Definitely beats the plastic OEM waterspout hands down.

      J
      John Moreno
      2024 yz450fx

      Easy install, fits perfect and no more plastic part

      E
      Ed Hodges
      Outstanding service

      I could not be happier with the service that XPR did for me with the vortex ignition just outstanding service .

      Description

      If you've ever wondered if the exhaust pipe on your 23/24 YZ 450 could melt the plastic OEM waterspout, we have engineered our own custom billet aluminum waterspout to prevent this from happening.

      *Please be aware that the colors of our products may vary slightly due to the production process.

      Please Refer to our Install Sheet for more information

      How to install

      ⚠ WARNING: Installing these parts improperly can damage your motorcycle, cause a crash, serious injury, or death.


      Before you start:

      Read these instructions and those in the OEM Service Manual for removing and installing any part as applicable. You need the OEM Service Manual for the proper procedures for the removal of parts, installation, and torque values or specifications.


      ⚠ Disclaimer: If you feel uncomfortable at all following these procedures, seek a professional mechanic for these modifications. We highly recommend you have these procedures and modifications professionally done. Proceed at your own risk!


      Tools & Supplies Required: (not supplied)

      • Common hand tools (e.g., wrenches, sockets, etc.)


      ⚠ CAUTION: Before you begin working, be sure you are wearing eye protection and gloves.


      Removal:

      1. Drain the engine's coolant.
      2. Remove the seat.
      3. Disconnect the battery.
      4. Disconnect the Coolant Temperature Sensor.
      5. Remove the Exhaust Header.
      6. Remove the OEM Waterspout and disconnect the coolant hose.


      Installation:

      1. Install coolant hose to the new Waterspout and tighten the hose clamp.
      2. Install the new Waterspout and O-ring into the head, ensuring it's firmly seated and bolted in to the OEM Service Manual's specifications.
      3. Connect the Coolant Temperature Sensor and secure it with the retaining clip.
      4. Reconnect the battery, reinstall the seat, and refill with the proper coolant.